
Vape Coil Tips: How to Prime a Coil
Oct 18, 2024
Knowing how to prime a coil is one of the most important things you can learn as a vaper.
You see, vaping may be fairly straightforward, but it definitely has a learning curve to it. The unique terminology aside, you also need to brush up on a number of things related to vape hardware and e-liquid flavours if you want to have a worthwhile experience.
Overlooking this process is akin to skipping grammar class: sure, you might get by, but you’re prone to make mistakes along the way. And some of these mistakes can be catastrophic. Catastrophic in the sense that you could incur losses as a vaper that you otherwise could have avoided. And catastrophic in the sense that these vaping mistakes could even see you give up on the whole thing altogether.
If you’re making your baby steps in vaping, one of the first things you need to get up to speed on is how to prime a coil.
But what is coil priming exactly, and why is it important?
Before we get to that, perhaps it would be in order to first explain the anatomy of a coil in order for this to make sense.
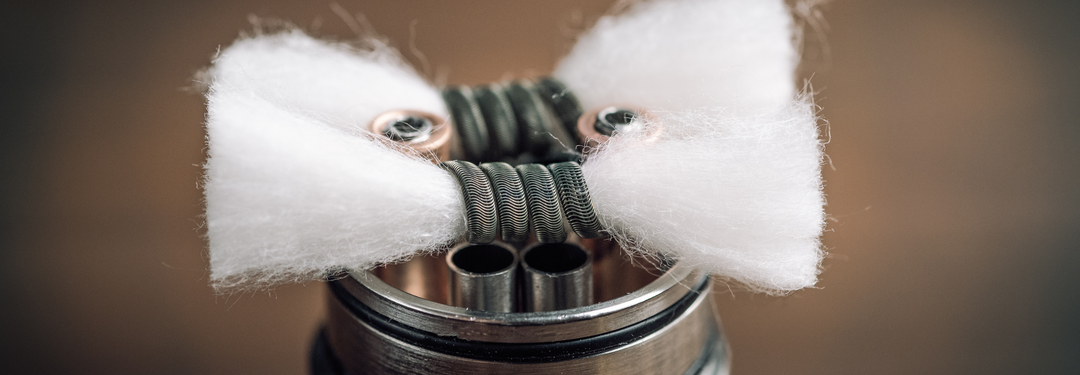
Anatomy of a vape coil
A vape coil is one of the key components of a vape device. Also known as the atomiser head, the vape coil a metal wire enclosed in a wicking material whose function is to absorb e-liquid from the vape tank.
Together, the coil and wicking material form the atomiser, a component housed inside the tank that is responsible for heating e-liquid and turning it into vapour. The wick is made up of either cotton or other materials like ceramic or mesh.
Once you fire up an e-cig device, the battery delivers electricity to the coil which then heats up the e-liquid that the wick has soaked from the tank, allowing vaporisation to happen. Without the atomiser, your device is just but a shell equipped with a battery.
So, what does priming a coil mean?
Priming a coil is a process that involves saturating the wicking material before you start vaping.
Priming is considered best practice because skipping this process causes dry hits or a burnt vape taste.
Dry hits are particularly common with new coils because the wick has not had enough time to soak up e-liquid. Since the wick is still dry, the cotton can burn when you start vaping immediately. This results in a repelling burnt coil taste that ruins the flavour of your vape.
Also Read: Top Reasons Your Vape Tastes Awful
Why is priming a vape coil important?
The importance of priming your vape cannot be emphasised enough. As mentioned, failure to prime your coil can lead to dry hits that are unpleasant to taste. If you are a beginner and not sure what you’re dealing with, this revolting taste is enough to turn you away from vaping real quick.
But more than that, a poorly saturated wick can result in muted flavour or underwhelming vapour production.
In short, priming your coil is important because it improves your vaping experience.
Priming also prevents coil damage to ‘dry spots’. A damaged coil does not function optimally and will require a replacement. If you install a fresh coil and fail to prime it properly, again, it will burn and force you into premature replacement.
Obviously, that’s not what we want. That not only denies you a true vaping experience, but premature coil replacement can be a costly drill.
This is why priming coils is super important.
If you ask around, a burnt coil is one of the most common issues vapers grapple with. But we are here to fix that.
Question is, how do you go about it?
Step by step guide on how to prime a coil properly
Priming a vape coil is a fairly easy process.
Step 1: Preparation
For starters, you need to gather a few items before you start priming your coil. You will need:
- A new coil
- A bottle of vape juice
- A paper towel
Step 2: Priming
- Unwrap your new coil from the packaging and inspect it for any potential damage or defects.
- On the side of the coil, you will see the exposed wicking material. It will likely look like two white circles which are probably opposite each other.
- With your e-liquid of choice in hand, pour a few drops through the holes exposing the wick. Don’t pour the juice directly into the centre of the coil.
- Turn the coil on the other side and repeat the process.
- Allow the coil time to sit and soak up the e-liquid into the cotton wick. This is what we call ‘wicking’. You can give it 10-15 minutes. If you are not in a hurry, you can let the coil wick for a couple of hours (or even overnight). This can enhance the taste of your e-liquid.
- Once you have allowed the wick time to saturate, gently wipe any liquid on the outside of the coil using a paper towel.
Step 3: Install the primed vape coil
With your vape coil now primed, it’s time to install it.
- Depending on the type of e-cig you’re using, reattach the primed coil to the base of the vape tank or insert it into the tank. Make sure it is secured in place.
- Take your bottle of e-liquid and load up your tank. Careful not to overfill it as this can lead to vape leakage.
Step 4: Test the coil
After installing your coil and filling the tank, it’s a good idea to test your coil first before you begin vaping.
- Take a few primer puffs to aid the juice in flowing to the coil. Do this while the e-cig is still off (that is, without firing the device).
- Next, activate your device and start vaping normally. If you’re using a variable wattage device, start at a lower wattage and gradually increase it until you achieve your desired experience.
In case you get dry hits or experience a burnt vape taste, you might need to prime the coil again. Stop vaping immediately and check the status of the coil. If it is soaked properly and the taste still feels off, chances are it’s probably a different issue such as a faulty coil.
Troubleshooting coil issues after priming
Even after priming your coil properly, you might encounter a few issues. These include:
- Dry hits. This is a sign that the wick was not saturated properly. It could also be a sign of a coil that is too hot. To resolve it, give the coil enough time to prime well or in the case of the latter, adjust your wattage settings accordingly.
- Burnt taste. When your vape tastes burnt, it could be because the coil was not primed properly or that the e-liquid that was used was too thick. Ensure that your coil is well saturated before you start vaping and that you are using the right e-liquid.
- Leaking. A leaky tank is a common occurrence. Often, it’s a sign that some components were not properly screwed properly or that the tank is overfilled. Make sure everything is sealed well and avoid overfilling your tank.
Other common mistakes to avoid when priming coils
Now that you know how to prime a coil, it is important to also be wary of some mistakes you could potentially make when priming. These mistakes can reduce your coil lifespan, result in poor flavour or lead to the issues we have identified above.
Below are some of the most common mistakes many vapers make when priming a coil.
Not giving the coil enough time to soak
As earlier pointed out, it is important to afford your coil and wick time to soak up the e-liquid properly. Failure to do this will result in dry hits and a vape that falls short on the flavour aspect.
When it comes to vape maintenance issues, one of the things we advise to do is schedule tasks in advance, whether that be cleaning your tank, priming your coils or even charging your device. This ensures everything is ready when you need it because doing things last minute is not only an inconvenience, but chances are it will compromise your sessions as well.
Related: E-Cig Maintenance Made Easy
Over-saturating the coil
Letting the coil sit for a sufficient amount of time when priming is great. But at the same time, it’s also possible to over-saturate it.
When you over-saturate your coil, you could end up with a leaking, gurgling or flooding e-cig. The key to avoiding this mistake is to not to add too much e-liquid when priming coils. Aim to establish the right balance.
Not priming the coil well
It’s important to know how to prime a coil properly. Equally important is not to skip the process when installing new coils.
Good coil priming involves pouring a few drops of vape juice directly onto the wick and then giving it a few minutes to saturate well.
Not using the right e-liquid
Another mistake some vapers make when priming a coil is not using the right e-liquid. The key question here is, is there a right and wrong e-liquid for priming coils?
Well, for one, it’s important to use an e-liquid that is compatible with your coil. It needs to have the right VG/PG ratio. Any liquid that can be considered too thick or too thin for the coil you’re using at any given time will result in poor wicking and a reduced coil lifespan.
In the case of sub-ohm juices in particular, these can easily clog the wick if it’s not fully primed. These e-liquids have a higher VG content which makes them thicker and more viscous, so it’s important to pay extra attention when priming sub-ohm coils.
Read: How to Make Your Coils Last Longer
Using the wrong wattage
Choosing the ideal wattage for your coil can help you avoid dry hits and burnt coil problems. Coils have a short lifespan as is, and you don’t need to shorten it even further since that means spending extra coin that could have been saved.
If the wattage is too low when vaping, the e-liquid may not vaporise properly because the coil is not heated well. This can lead to dry hits. Conversely, if you’re using too high a wattage than is recommended for your coil, this can burn the wick, resulting in an unpleasant taste.
Conclusion
Coil priming is a necessity whenever you’re swapping coils or every time you change the vape juice. It’s one of the ins and outs of vaping that every vaper needs to be conversant with in order to improve their experience.
The good thing is that priming vape coils is a fairly straightforward process that should only take you a few minutes. And we hope that the procedure we have outlined in this post will come in handy for you in that regard.
Frequently Asked Questions (FAQs)
What does priming a coil mean?
Priming a coil is simply a process that involves saturating the wicking material in a vape coil before vaping. It is important to do this when installing new coils or changing e-liquids to prevent dry hits or damage to your coil.
How long should I prime a coil for?
When priming coils, it is important to give them time to soak up e-juice. As regards the exact time, anywhere between 10-15 minutes should do, but it doesn’t hurt to leave them for longer if you have the time. Priming vape coils for longer can enhance the taste of your vape.
It’s also worth noting that sub ohm coils need to be primed for longer compared to regular vaping coils. This is because sub-ohm juice takes longer to wick due to its high viscosity. As such, you need to be more patient with these coils.
What if I don’t prime my coil?
As you’ll soon find out, not priming your coil will be ill-advised. While the wick will not be completely dry, it is likely to give you dry hits because the cotton will likely have dry spots that are not soaked properly. The taste in your vape will not be unpleasant if that’s the case.
More than that, though, vaping without priming your coil will likely fry the coil, thereby necessitating premature replacement. Nobody wants to keep replacing coils because it can turn out to be a costly venture.
How often should you prime your vape coil?
Understanding how to prime a coil is a crucial aspect of being a vaper because it is something you will be doing on a frequent basis. You should prime a coil before using a device for the first time, as well as every time you install a new coil or replace the wick.
The logic is that the coils at this point are dry since they have not had the time to soak up e-liquid. And that vaping with a dry coil will create a burnt vape taste or even damage the coil.
Why am I getting dry hits on a new coil?
Because you are not priming your vape coil after installing the new coil. Or could be that you are not doing it well.
It’s essential to ensure your coil is fully submerged in e-liquid before using it for the first time. At the same time, however, you should not over-saturate the coil as this could lead to leaking. The key is to get the balance right. As well, make sure to test your coil after priming before you activate your e-cig.


